
How to Grow Hellebores
Key Facts:
Height: most >30cms, H. Corsican and foetidus 50cms+
Light: best in dappled shade
Soil: any well drained
Maintenance: Some, cut back old leaves at the end of winter and can be prone to black spot.
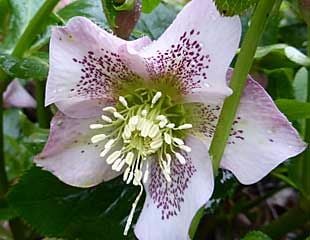
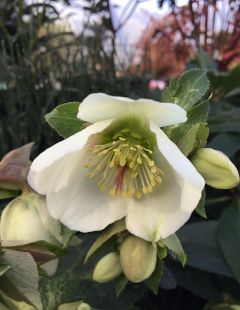
Special features: Late winter/early spring flowering perennial which naturally self seed. Many flowers have beautiful interiors with speckles. The single flower varieties are a good source of early nectar for bees.

Hellebores are a Green Wheelbarrow plant, as they are easy to grow with little maintenance
A comprehensive guide to growing Hellebores
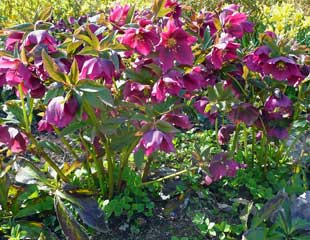
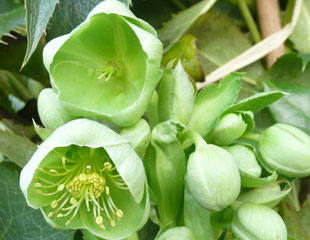
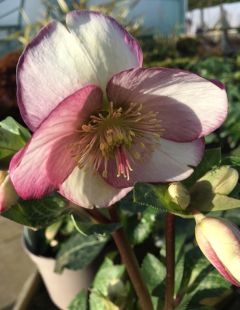
A woodland plant, Hellebores are best suited to dappled shade, but there are also varieties suitable for deep shade and sun. Most Hellebores are low-growing plants reaching about 3-.5m high. Hellebores flower from December through to spring, depending on the variety. Hellebores have a wide range of flower colour, crimson, red, subtle pinks, various shades of yellow and white, many with attractive speckles inside the flowers. There is also a bright green variety of Hellebore, illustrated centre top, Helleborus argutifolius, the Corsican hellebore, which is one of the few tall varieties, reaching 60cm.
Hellebores are a fast-moving group of plants because new hybrids are being developed all the time, and there are dozens of wonderful varieties on sale, with more colours, double petals, and some with more upright flower heads. Below are two recent additions to the Helleborus family. Developed from a breeding programme painstakingly undertaken by Rodney Davey to combine strong colour and marbled foliage.
Most Hellebores routinely offered for sale are Helleborus hybridus ( previously known as H.orientalis,) commonly known as the Lenten rose to distinguish from Helleborus Niger, the Christmas rose which flowers earlier.
In the garden, many Hellebores will self seed and multiply into clumps, as in the image top left. Many varieties have nodding flower heads which hang down. Hellebores are usually evergreen, although also semi-evergreen/deciduous in cold winters.
Suttons have a lovely selection of Hellebore on sale (affiliate link)
Where to plant and how to care for Hellebores
Helleborus is a tough, versatile plant. Preferred growing conditions are neutral to alkaline soil with dappled shade. That said, Hellebores will tolerate a wide range of growing conditions, excluding only very wet or dry conditions. This makes Hellebores suitable for planting almost anywhere in the garden. Hellebores are quite vigorous and quickly multiply to create larger clumps.
Hellebores are self-seeders (although not all the modern hybrids, which do not always produce seed.) If you want to restrict the spread of Hellebores, remove the spent flower heads. When they self-seed, the new seedlings will form a clump near the parent plant, which will flower after two or three years. Most are very hardy, H5, which is -5 -10.
Hellebores look good underplanting shrubs. In this arrangement, it is best to raise the canopy of the shrubs to reduce the shade.
Hellebores require a little routine maintenance. If you have time, I think Hellebores do best with the old foliage removed in late winter. (see images below.) Removal of most or all of the foliage displays the flowers at their best, leaving just the new, young foliage coming through. In some professional gardens, such as the RHS, I have seen all the old foliage removed.
The second reason to remove foliage is that Hellebores are prone to black spot, and by Dec/Jan the leaves can have evidence of black spot. In 2017/2018 we suffered a wet winter. As a result, I cut all the leaves from the Hellebores to remove the black spot infestation.
Although the leaves are required for photosynthesis, it is safe to remove them in late winter, as the new foliage will grow through, ready to carry on the photosynthesis. As a woodland plant, hellebores benefit from a mulch of leaf mould, although any well-rotted organic matter will be suitable.
Most Helleborus are fully hardy and will grow reliably year after year. Some Helleborus × hybridus are borderline, which means they may need winter protection in more exposed gardens.
When to cut back Hellebores
Advice varies about removing leaves from Hellebores.
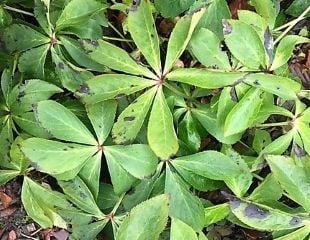
There is consensus that Hellebores are prone to Leaf/Black spot characterised by unsightly brown and black patches on the leaves. There is agreement that all infected leaves should be removed and not composted. Some growers remove leaves in November/December, some in January, and some remove only the previous year's growth, while others remove most of the leaves.
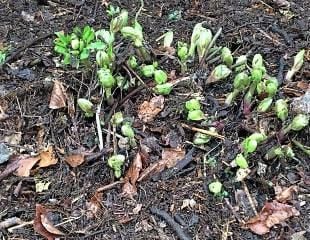
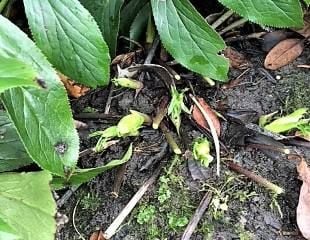
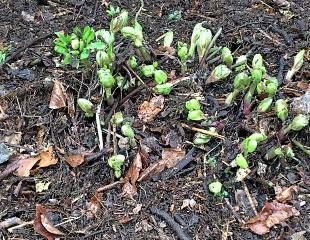
I tend to remove most of the leaves in January to display the flowers and make way for the new leaf growth, which will follow the flowers. The images below are of the Hellebores I have cut back. In January, the foliage can be in a poor state with evidence of leaf spot. The second image shows the same plant after cutting back with a mulch of leaf mould, from which plenty of new growth is evident.
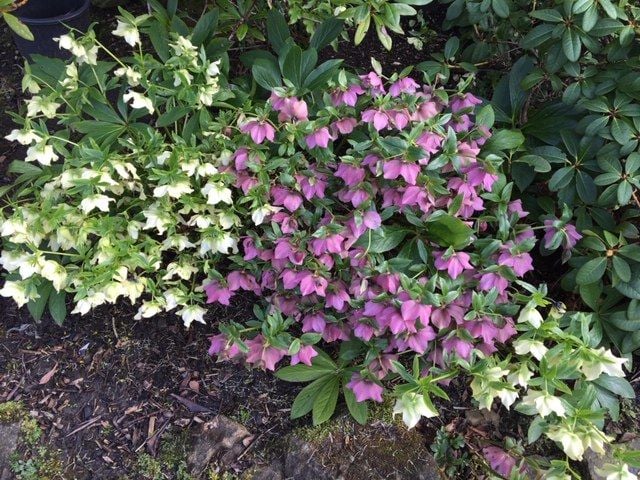
If your Hellebores are looking sickly, be bold and take heart from these images and cut off all impoverished leaves. The plants will quickly come back and look better. The final image shows the same clump of Hellebores in full bloom some weeks later.
Sickly looking Hellebore before cutting back
Hellebore after cutting back almost all of the leaves
Fast forward in full bloom some weeks later
To show it is safe, here are the before and after images.
The image below is the same as the Hellebores shown above, which were cut back in January. Fast forward two months later, and they are in full bloom and looking good. In case you hesitate with the secateurs, because this seems like a drastic cut, feel reassured by the before and after photos. The Hellebores will flower and look much better without all the tired-looking foliage.
A word of Warning
Hellebores are in the group of plants whose leaves can cause skin irritation, sometimes severe. Be aware that Hellebores can cause a chemical reaction on the skin, which is very uncomfortable. When cutting back Hellebores back, it is best to wear thick gloves and cover arms with long sleeves. Having failed to do so recently, I can vouch for the discomfort. It is akin to being badly stung by stinging nettles!
If you are worried about poisonous plants, the RHS has a comprehensive list plus links to websites which list plants poisonous to pets.
Growing Hellebores from Seed
Some varieties of Hellebores self seed. To ensure the safe passage of the tiny seedling, it's best to dig it up and pot it on into a small container and grow for a season and then plant it out. Not all will self-seed, and even if they do, the resulting plant will often be different and inferior to the parent plant. Unless you have a large area to cover and are looking for an economical way to fill it, you may wish to deadhead Hellebores to preserve the integrity of your existing stock of plants.
You can also collect seed, which will be around May time. The seed is best sown immediately and leave the pots outside to get a cold spell, and they may germinate later/the following year. Growing from seed can be a slow process, and I find nature does it better than I do. Just leaving the Hellebores to self seed usually produces a few new plants each year.
How To Divide Hellebores
Divide Hellebores to create new plants for free. This may be better than self-seeding as your new plant remains true to the parent plant.
Helleborus niger (Christmas rose) is best divided in the spring, and Helleborus x hybrids, the lenten rose and the orientalis varieties, are best divided in the late summer or autumn. However, Hellebores are tough and should survive being divided at any time, except in frosty winter weather and/or when they are in full bloom.
To divide, lift the clump, keeping as much root as possible, cut into largish pieces about 15cmc each (6") and replant, watering well. After replanting, Hellebores may take a little while to re-establish, which can mean a lack of flowers in the following late winter/spring, but they should do better after that.
There are two types of Hellebore which are not suited to division. Helleborus foetidus, known as the stinking Hellebore. It is tall, up to .5m and predominantly green, and H. argutifolius, the Corsican Hellebore (top centre image) which is similar to look at, mainly green flowers and similar size but with prickly leaves. If your Hellebores are tall with green flowers, it is best not to divide them.
What to do about Hellebore Black Spot
Hellebores are more or less trouble free except they can suffer from the common fungal problem of leaf spot, which as the name suggests means the leaves get marked with black or brown marks. The image below shows what Hellebore black spot looks like, and the simple solution is to cut off infected leaves.
If the infection is severe, cut off all the leaves, the plant will survive. The plant does not seem to suffer from having many leaves removed, and new ones replace them in the spring. Always remove any brown or black leaves; the plant will survive even if almost bare. Never compost infected leaves.
Hellebores can also get Black death, which causes black streaking on the stems, leaves and even flowers and looks different to Leaf Spot as is distinct streaking often along the veins. Eventually, if left unchecked, it will kill the plant. The solution is to remove the leaves at the first sight of it, the same as with Leaf Spot. In common with many plants Hellebores can get Downy mildew, a fungus, covering the leaves with yellow spots and off white mould. Remove and bin affected leaves.

Hellebores suitble for Sun and full shade
Hellebores are widely tolerant of most conditions if you have a particular spot in mind, it is worth considering the following tips.
The Hellebores lenten rose types will grow almost anywhere. They are best in damp, well drained soil in dappled shade. If grown in sunnier conditions, the soil needs to be more moist.
If you want to grow Hellebores in dry shade, a variety to try is Helleborus x nigercors or H. foetidus (the stinking hellebore, possibly not so attractive)
In sun, Helleborus x sternii and Helleborus odorus, the latter is a green variety, fragrant and both are slightly tender.
Images of Hellebores
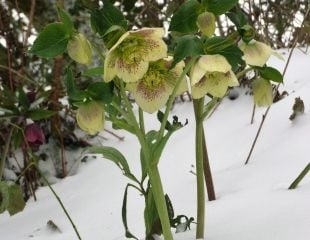
Hellebores will withstand quite severe weather including frost and snow. Illustrated is a Hellebore braving the winter snow. No matter how bad the snow, Hellebores lift up their heads and emerge unscathed.
Hellebores as a source of early nectar
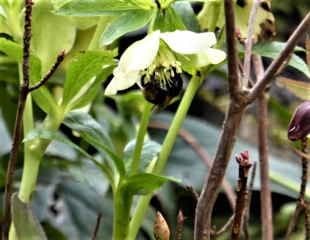
Hellebores flower for a long time and is one of those rare and treasured plants whose flowers look good as they fade. Given that Hellebores flower early in the year, they are an excellent source of nectar for emerging solitary bees.
What to plant with Hellebores

As a woodland plant, Hellebores look good with spring-flowering bulbs such as Iris reticulata, Grape Hyacinth, Winter Aconite, Snowflake, and Fritillaria are all good companions.
I think Hellebores look particularly attractive planted with snowdrops.
lime Green Hellebores

This is Helleborus foetidus the stinking hellebore, which is much nicer than its name suggests. The unpleasant smell of its crushed leaves gives it its name, and it is native to the UK.
That aside, it has long-lasting winter colour with the lime green flowers contrasting against the dark, almost black foliage. Grows up to around .5-1m, hardy to -7 so it will withstand any winter, just don't stand on it.
Hellebores as Cut Flowers
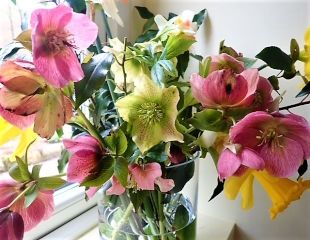
Growing your own cut flowers is becoming more popular as a means of reducing your carbon footprint and saving money.
Hellebores make surprisingly good cut flowers and, team up well in the vase with early spring flowers such as daffodils, forsythia.